Connecting your FloathHub to a NMEA source lets you monitor more data from your boat. Wind conditions, speed through water, depth, and water temperature are just some of the streams your device can interpret and relay for remote monitoring. But troubleshooting NMEA connections can sometimes be a frustrating endeavour.
Our recommended approach involves connecting a laptop or other portable computer directly to your FloatHub device via a USB A-to-B cable. You should have received one with your FloatHub, but they are widely available (an example from amazon is here). Because your FloatHub will echo any and all valid NMEA data it is receiving (from any source) out via its USB port, this lets you immediately see the results of any successful connections. This approach does not require any network connection or even a WiFi link to your device. And you don’t have to wait for summary data to propagate up to the floathub.com website; you can immediately see the results of a successful NMEA connection.
In addition to a laptop and USB cable, you will need a terminal program that will let you see what data is travelling over the USB connection. There are literally hundreds of suitable terminal applications, but we suggest the following:
- For Windows users, we recommend TeraTerm (information about TeraTerm is available on Wikipedia, and it can be downloaded from osdn.net).
- For Mac users, you can use the built in “screen” command inside a terminal window (more detail below).
- Linux users can also use gnu screen to talk to USB devices.
Configuring TeraTerm for Windows Users
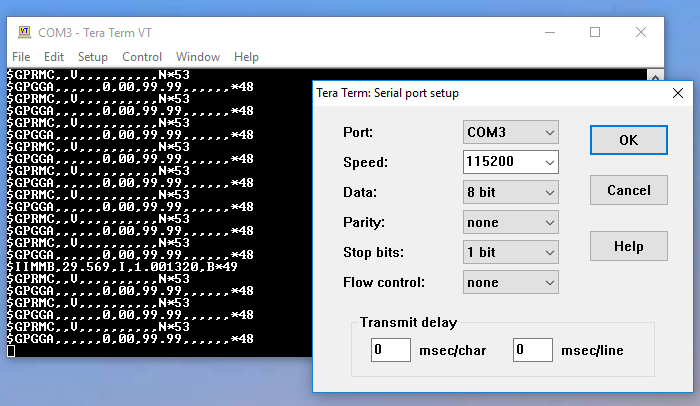
Configuring TeraTerm should be quite straightforward. Once you have install it from the link above, go ahead and launch the program and plug in your FloatHub device via USB (you do not need to power it off first). If you select Setup->Serial Port, you should see at least one “com port” (listed as COM1, COM2, etc.) available on the Port drop down menu. Choose that port and make sure to change the Speed to 115200. Once you click OK and then connect to that serial port (the USB connection to your FloatHub device is a “serial” connection), you should start to see NMEA “sentences” begin to scroll by. If nothing appears, try a different COM port if one is available.
Using screen with Mac OS X
The main challenge with using the screen command (inside a terminal window run from Applications → Utilities → Terminal) is knowing which serial port device argument to run it with. Inside your terminal window, and with your FloatHub’s USB connection plugged in, you can list likely candidates by typing:
ls /dev/tty.*
Unless you have a number of other USB-serial devices connected to your Mac, there should only be a single entry and it should be something like “/dev/tty.usbserial-A6004byf”. You use it like this:
screen /dev/tty.usbserial-A6004byf 115200
which means to use the screen command to connect to your device (e.g. /dev/tty.usbserial-A6004byf) at baud rate 115200.
Using screen with Linux
The gnu screen package is available on all major Linux distributions, and works like the Mac OS X instructions above. For detecting the relevant serial port, the easiest approach under Linux is to run the following command:
dmesg
immediately after plugging in your FloatHub via USB. The last few lines of output from dmesg should list the serial device name assigned to your FloatHub.
Monitoring the NMEA Stream
When you first connect your terminal program to the relevant USB port (before connecting any additional NMEA sources or devices), you should see data scroll by that looks something like this:

The important thing to notice is that the sentences will almost all begin with $GPGGA or $GPRMC and will appear roughly every second or so (in sets of two). These all describe GPS related information from your FloatHub’s internal GPS unit. You may also see much less frequent sentences that begin with $IIMTA, $IIMMB, or $IIXDR. These are different ways to describing the current air temperature and barometric pressure that your FloatHub is measuring.
With the above as a baseline, it is now very easy to see if any changes to the NMEA data stream occur as you attempt to connect other devices to your FloatHub’s Data-In or High-Speed Data-In connections. Almost all NMEA sources will have a pair of wires that carry the NMEA signal. This should either be clearly labelled with a positive and negative designation, or there should be a legend in your device’s documentation that maps wire colors to polarity values. You don’t need to power off your FloatHub when testing these connections, but it is best to try and make sure the polarity is correct. Also, in some quite rare cases, successful communications will occur with only a positive connection (with the vessels universal ground, to which your FloatHub is already connected, serving as the return channel for the circuit).
Whatever the connection type that eventually works, you will know either from the sentence type or rate of updates (or both) that something has changed. Here is an example with both a multisensor transducer output connected (via Data-In) and an AIS transponder (via High-Speed Data-In):

In addition to the obvious increase in message rate, there are now sentences beginning with !AIVDM, $FHDPT, and other preambles. The !AIVDM message, for example, is AIS traffic being communicated.
As with all our guides, any comments, questions, or requests for clarifications are always welcome.